

- trackaffadmin
- 0 Comments
- 23 Views
Scheduling an event on Facebook, in the sense that matters for Meta advertisers, means capturing a post-click off-site conversion (a purchase, deposit or registration) and reporting it back to Meta with a matching event_id for deduplication. Three conditions define success: the fbclid is captured at the point of click, the same event_id appears in both the Pixel and Conversions API (CAPI) payloads, and the CAPI event reaches Meta within a deduplication-safe window.
TL;DR:
- Successful attribution requires capturing fbclid at click, matching event_id in both Pixel and CAPI, and ensuring CAPI events arrive within 48 hours.
- Using both Pixel and CAPI signals improves match quality, but mismatched IDs or late timing can cause double counting or missed optimization.
- Implementing a consistent event_id from sources like session or order IDs across all tools ensures proper deduplication and accurate conversion reporting.
- Verification steps include testing in Events Manager, confirming single deduplicated counts, and inspecting network requests for correct event_id passing.
- TrackAff offers pre-built, branded forms and automated server-side integration to simplify reporting off-site conversions with deduplication in place.
Table of Contents
- Why dual-signal Pixel and CAPI reporting drives accurate attribution
- Step-by-step checklist to capture and report an off-site conversion
- Common implementation patterns across GTM, Stripe, CRM, and booking tools
- How to test and verify events are firing and deduplicating correctly
- Quick privacy checklist before sending events to Meta
- Overview of how to schedule events directly on Facebook
- Step-by-step instructions for creating and scheduling a Facebook event
- Managing and editing scheduled Facebook events
- Promoting a scheduled Facebook event with ads or organic reach
- Best practices for engaging attendees and tracking RSVPs
- Troubleshooting common issues in scheduling and publishing Facebook events
- Author perspective: how this scheduling approach improves optimization and reporting
- How TrackAff helps schedule and report off-site events reliably
- Sources
- FAQ
Why dual-signal Pixel and CAPI reporting drives accurate attribution
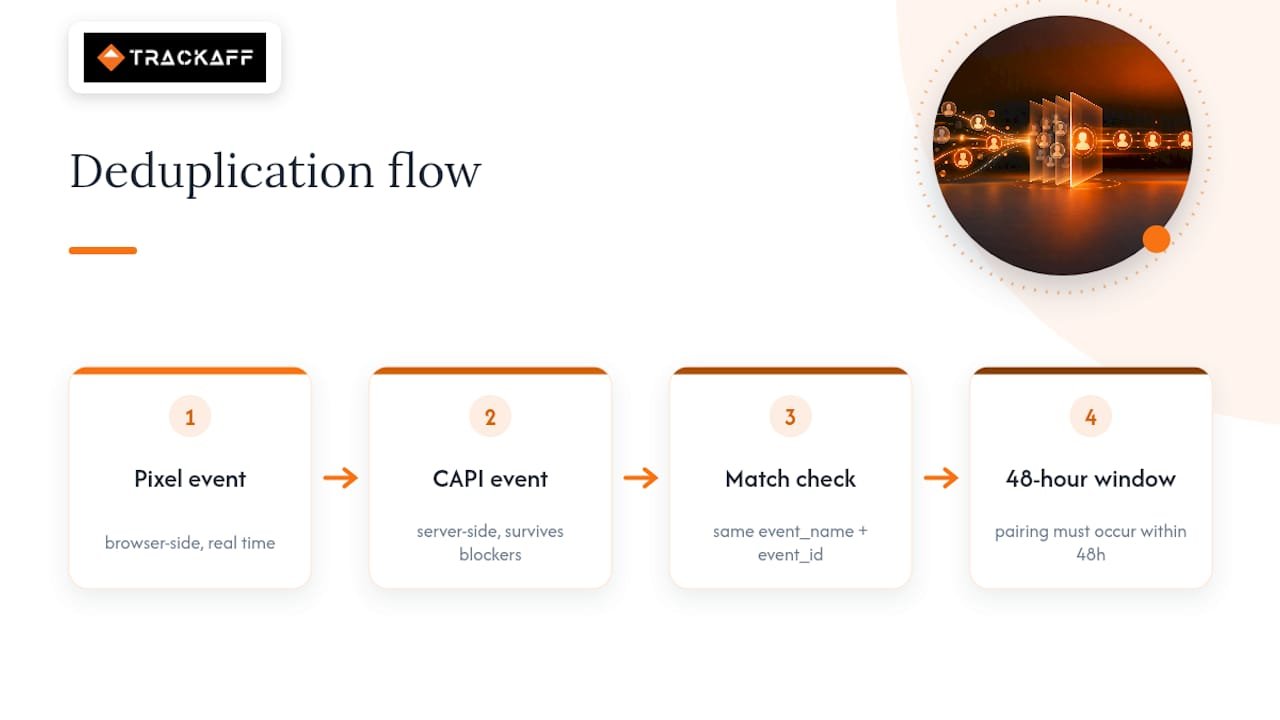
Meta’s attribution model works best with two independent signals for the same conversion. The Pixel captures browser-side behavior in real time, while CAPI sends the same event from your server, where it survives ad blockers, browser privacy settings and session timeouts. Running both together, as recommended architecture, improves Event Match Quality because the server-side record can carry hashed personal data and richer custom_data than a browser event alone.
The risk with two signals is double counting. If Pixel and CAPI both report the same purchase without a way to link them, Meta’s optimization treats it as two separate conversions. Inflated conversion counts distort campaign performance and push budget toward audiences that only look effective.
Meta solves this with deduplication. Events are merged when the Pixel and CAPI payload share the same event_name and an identical event_id, and this pairing must happen within a 48-hour window. That 48-hour rule is the single most important constraint in this entire setup. Get the event_id matching right and the timing right, and Meta counts one conversion, attributes it to the correct ad, and optimizes toward more of the same. Get either wrong, and the campaign data quietly degrades.
Step-by-step checklist to capture and report an off-site conversion
Off-site conversions happen after the click, often minutes or days later, so the connection between the ad and the sale has to be built deliberately. The following sequence covers the technical steps in order.
- Capture the fbclid parameter on the landing page and persist it in a cookie or a CRM field so it can be reconstructed into fbc later.
- Generate or select a unique event_id at the moment of conversion, using an order ID, a Stripe session ID or a generated UUID.
- Push that event_id into the GTM dataLayer, or store it in a first-party cookie, then map it into the Pixel’s eventID parameter.
- Send the identical event_id and matching event_name in the server-side CAPI payload, along with hashed user_data.
- Confirm the CAPI event lands within the 48-hour deduplication window and set action_source to reflect where the conversion actually happened.
- Strip test_event_code from production code and check the Pixel’s network request for the eid parameter to confirm the client side fired correctly.
Each step depends on the one before it. Skip the fbclid capture and there is nothing to match the sale back to the ad. Skip the shared event_id and Meta double counts. Skip the timing check and a legitimate conversion may arrive too late to be deduplicated, or too late to influence optimization at all.
Pro Tip: Log the event_id at every stage of the funnel (landing page, checkout, CRM record) so a failed match can be traced to the exact step where it broke.
Common implementation patterns across GTM, Stripe, CRM, and booking tools
Most implementations fall into a handful of repeatable patterns, depending on the stack already in place.
- GTM pattern: push a variable such as metaEventId into the dataLayer, read it with a Data Layer Variable, then map that variable into the Pixel tag’s eventID field.
- Stripe webhook pattern: listen for checkout.session.completed, use the session ID as the event_id, and fire the CAPI call directly from the webhook handler.
- CRM or HubSpot pattern: run a webhook or scheduled sync that posts new closed deals using an identifier like hs_deal_{id} as the event_id.
- Booking software pattern: use the membership or registration activation ID as the event_id and tag custom_data with fields like location and content_type.
Each of these examples pulls from documented server-side patterns for offline and delayed conversions, where a payment gateway or CRM object ID stands in for a generated UUID.
Persist fbclid the moment it appears in the URL query string, then format it as fb.1.{timestamp}.{fbclid} when sending it to CAPI, since Meta expects that exact structure to match the click.
Where fbclid is stored matters as much as whether it is stored. A cookie works for same-session conversions. A CRM field is necessary when the sale closes days or weeks after the click, which is common for registrations, deposits and B2B deals.
How to test and verify events are firing and deduplicating correctly
Verification happens in three places before anything goes live.
- Send events through the Test Events tool first, confirm both Pixel and CAPI events appear paired, then remove the test_event_code before deploying to production.
- Open Events Manager and check that Purchase, Lead or Registration events show a single deduplicated count rather than two separate entries with the same event_id and event_name.
- Review Event Match Quality and look for missing parameters, then inspect the facebook.com/tr network request for the eid field to confirm the Pixel actually passed eventID.
Some platform-native CAPI integrations omit event_id entirely, which means Pixel and server events never deduplicate even when both signals fire correctly on their own. This is worth checking directly rather than assuming a plug-and-play integration handles it.
Leaving a test_event_code in production is a related and common mistake: it routes live events to the Test Events panel instead of the production model, which quietly stops those conversions from influencing optimization at all.
Quick privacy checklist before sending events to Meta
A short set of habits keeps server-side reporting compliant without turning this into a legal exercise.
- Hash emails and phone numbers with SHA-256 before including them in any CAPI user_data field.
- Store fbclid and related identifiers in first-party cookies, and respect consent requirements where they apply.
- Never send raw, unhashed personal data. Follow Meta’s published user_data schema for every field.
Overview of how to schedule events directly on Facebook
Separate from post-click conversion reporting, Facebook’s own interface lets a Page create a public listing with a date, time and description that people can find and RSVP to. This native scheduling tool lives inside Facebook’s Events section, accessible from a Page or personal profile, and it is built for organizing gatherings rather than reporting sales data.
The interface walks the organizer through the basic fields: event name, start and end time, location or online link, and a description box. Facebook also offers recurring event settings for anything that repeats weekly or monthly, along with a cover photo upload and category tagging that helps the listing surface in relevant searches.
For a business running paid campaigns, this native event listing can sit alongside the attribution work described earlier. The event itself, and the RSVP that follows it, is a separate data point from the purchase or registration conversion that gets reported through Pixel and CAPI. Both matter for a complete campaign, but they answer different questions: one is about who plans to show up, the other is about who actually converted.
Step-by-step instructions for creating and scheduling a Facebook event
Creating a listing starts from the Page’s Events tab, where a Create Event button opens the setup form. From there, the process follows a fixed sequence.
First, choose whether the event is in person or online, since this changes which fields appear next. An in-person event asks for a physical address, while an online event asks for a link or instructions on where to join.
Second, set the date and time. Facebook allows a single-day event or a range spanning multiple days, along with an optional end time.
Third, write a description that tells people what to expect, who it is for, and any details they need before attending, such as parking, dress code or an agenda.
Fourth, add a cover image, since events with a clear visual tend to display more prominently in a Page’s event list.
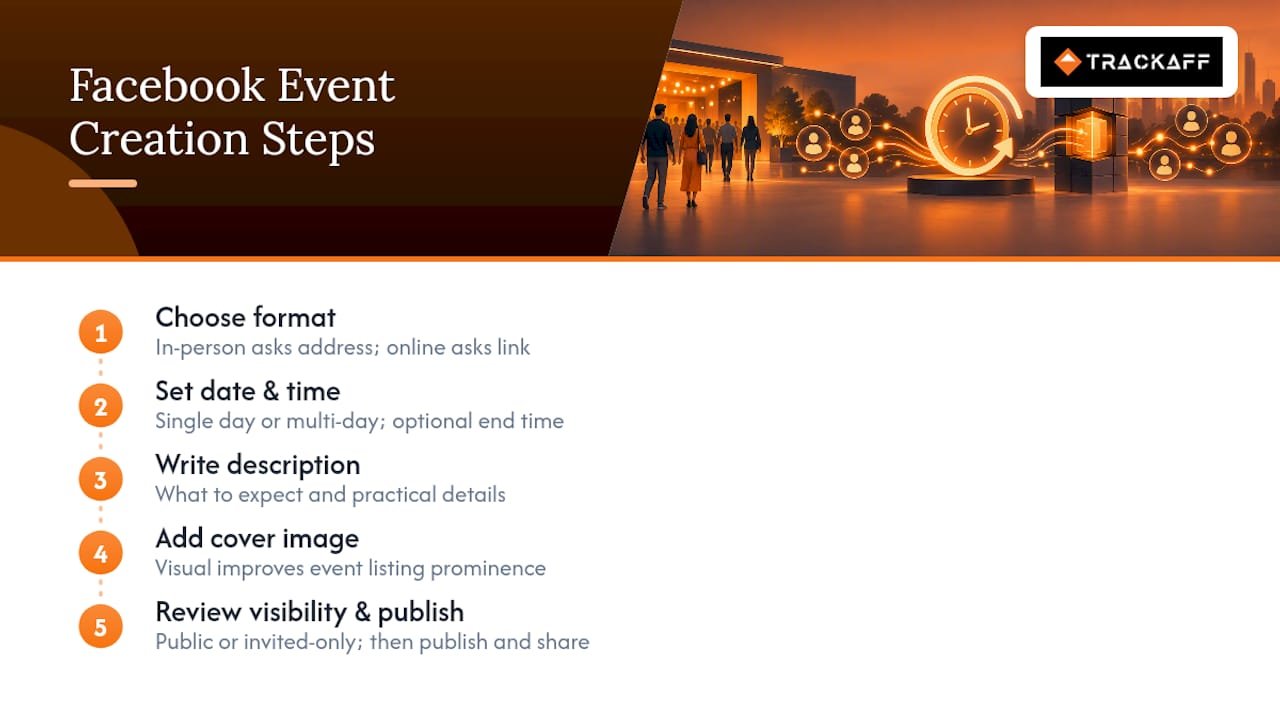
Finally, review the visibility setting (public or limited to invited guests) before publishing. Once published, the event appears in the Page’s Events tab and can be shared as a post to the Page’s timeline.
Managing and editing scheduled Facebook events
Once an event is live, the organizer can return to it from the Page’s Events tab to make changes. Editing works the same way as creation: date, time, location and description are all editable fields, and any change triggers a notification to people who have already responded.
Canceling an event is a separate action from editing it, and Facebook prompts for a reason when an organizer cancels, which then gets shown to anyone who had RSVP’d. This matters for businesses running paid promotion against the event, since a cancellation after ad spend has gone out needs a clear, timely notice to avoid confused guests.
Duplicate events, where the same date, time and location get published as two separate listings, are a common management issue for organizations running recurring meetups. Consolidating into a single recurring event, rather than creating a new listing each time, keeps RSVP counts and engagement history in one place instead of splitting them across near-identical pages.
Promoting a scheduled Facebook event with ads or organic reach
Once an event is published, it can be promoted the same way any other Page content gets promoted, through paid ads or through organic sharing.
For paid promotion, the event listing itself can be boosted directly from the Page, which pushes it into the feeds of a defined audience. This works well for driving RSVPs and awareness ahead of a set date. It is a separate mechanism from the off-site conversion tracking described earlier in this article. An event boost measures reach and RSVP activity, not the purchase or registration data that Pixel and CAPI report back to Meta for optimization.
Organic reach works through sharing the event post to the Page’s timeline, tagging co-hosts if any exist, and encouraging early RSVPs, since a listing with early engagement tends to surface further to people connected to those who have already responded.
Best practices for engaging attendees and tracking RSVPs
Once people RSVP, the event’s Discussion tab and reminder posts become the main tools for keeping attendees engaged before the date arrives. Posting updates, answering questions in the discussion thread, and sending a reminder as the date approaches all help convert a “maybe” RSVP into an actual attendee.
RSVP tracking through the native event tool shows counts by response type (going, interested, not going) but does not connect those responses to any downstream sale or registration. For a business that needs to know whether an RSVP eventually became a paying customer or a completed registration, that connection has to be built separately, using the event_id and CAPI reporting pattern covered earlier in this guide, rather than relying on the RSVP count itself.
Troubleshooting common issues in scheduling and publishing Facebook events
A few recurring problems account for most scheduling issues. An event that will not publish often has an incomplete required field, most commonly a missing location or an end time set before the start time. Checking each field against the form’s requirements before hitting publish resolves most of these.
An event that appears to duplicate itself usually traces back to two separate listings created for the same date instead of one recurring event. Consolidating into a single listing, as noted earlier, fixes the split RSVP counts that come with duplicates.
Low visibility, where an event does not seem to reach people beyond direct shares, is often a category or targeting issue rather than a technical failure. Adjusting the event category and confirming the audience setting is broad enough for the intended reach usually addresses this.
Author perspective: how this scheduling approach improves optimization and reporting
Matching a reported event to an actual buyer, not just a lead, is what moves campaign optimization in the right direction. When Meta trains on real purchases instead of clicks or form fills, cost per acquisition tends to fall because the algorithm stops chasing people who never buy. This is the practical reasoning behind a branded-form capture pattern.
— Terry
How TrackAff helps schedule and report off-site events reliably
Building the event_id, CAPI and deduplication pipeline described above from scratch takes engineering time most marketing teams do not have to spare. TrackAff packages that same pattern into a branded form that sits inside your funnel, captures the post-click conversion, and reports it back to Meta with deduplication already handled.
- Branded, white-label forms capture purchases, deposits and registrations directly in your funnel.
- Conversions API reporting with pixel and CAPI deduplication support built in.
- CRM webhook integration for syncing off-site conversions from your existing sales tools.
Pricing runs per connected funnel with multiple rate tiers available, including an Enterprise plan on request. Start a free trial to see how off-site conversions map back to the ads that drove them.
Sources
- Meta Ads Event Deduplication: What It Is & How to Improve in 2026 | Spilno Agency
- Meta Events Manager: Setup, Signal Quality & Optimization Guide 2026
- Meta Conversions API for Offline Lead Tracking: 2026 Setup Guide
- Test events vs production CAPI | test_event_code, Meta CAPI, Facebook CAPI
FAQ
What is the 48-hour deduplication window?
It is the time frame within which Meta matches a Pixel event and a CAPI event sharing the same event_name and event_id into a single conversion. Events sent outside that window, or with mismatched IDs, get counted separately instead of deduplicated.
Why is my CAPI event not deduplicating with Pixel?
The most common cause is a missing or mismatched event_id between the two payloads, since some platform integrations omit it by default. Checking the facebook.com/tr network request for the eid parameter and comparing it against your server-side payload usually finds the gap.
Should I leave test_event_code active after testing?
No. Leaving test_event_code in production routes live CAPI events to the Test Events panel instead of the production optimization model, which stops those conversions from counting where they matter.
How do I generate an event_id for offline or delayed conversions?
A payment gateway session ID, a CRM record ID, or a generated UUID all work, as long as the same value is sent in both the Pixel and CAPI calls. Common patterns include using a Stripe session ID or a prefixed CRM deal ID as the shared identifier.
What does TrackAff actually capture and report?
TrackAff captures off-site conversions like purchases, deposits and registrations through a branded form placed inside your funnel, then reports them to Meta through the Conversions API with deduplication support. Current prices can be found on the pricing page, and a free trial is available to test the setup.
Your deals close off the pixel. Meta never finds out.
TrackAff reports your real conversions back to Meta the moment they happen, tied to the exact ad that produced them. 10-minute setup, no code.
Start free 14-day trial → Card required · No charge until day 14 · Cancel in one click