

- trackaffadmin
- 0 Comments
- 40 Views
Yes, implement Meta Conversions API. If you run on Shopify, WooCommerce, or another supported platform, start with one-click or partner integration first. Developers managing multi-platform stacks should look at server-side GTM or the direct API instead, and reserve Gateway for a quick managed relay. Before any of that, confirm your Pixel ID, generate an access token, and plan your deduplication logic.
TL;DR:
- Using one-click or partner integration is the fastest and easiest way to implement Meta Conversions API on supported platforms, requiring minimal technical effort.
- Generating a valid access token, matching Pixel ID, and correctly hashing PII are critical steps shared across all implementation methods to ensure data accuracy and privacy compliance.
- Event deduplication depends on consistent
event_idgeneration and matching on both browser and server sides, preventing inflated conversion counts that mislead optimization.- Regular testing with real transactions, monitoring event throughput, and verifying deduplication tags are necessary to maintain accurate data flow and detect issues early.
- For off-site or post-click conversions, tools like Trackaff fill the tracking gaps by reporting actual customer actions directly to Meta, improving ad campaign measurement.
Table of Contents
- Conversions API Setup: Comparing the Five Implementation Methods
- What Do You Need Before You Start a Conversions API Setup?
- The Universal Setup Checklist Every CAPI Method Shares
- How Do You Set Up One-Click and Partner Integrations?
- Setting Up the Conversions API Gateway
- Server-Side GTM: Mapping and Forwarding Events Correctly
- Direct API Integration: Payload Rules for Developers
- Why Do Deduplicated Events Sometimes Fail to Merge?
- Which User Parameters Improve Event Match Quality Most?
- How Do You Verify Events Are Working Correctly?
- When Post-Click Tracking Software Closes the Gaps CAPI Can’t
- Privacy Compliance and Conversions API: What You Need to Know
- Security Practices Beyond Hashing: Protecting Your Access Token
- How Should You Prioritize and Organize Your Events?
- The Real Bottleneck in CAPI Setup Isn’t the API
- Get Guaranteed Post-Click Reporting With Trackaff
- Sources
Conversions API Setup: Comparing the Five Implementation Methods
CAPI complements the Meta Pixel by sending events from your server instead of relying only on the browser. That distinction matters because browser-based tracking breaks constantly, from ad blockers to Safari’s Intelligent Tracking Prevention to the industry-wide move away from third-party cookies that Reuters has documented. Five methods exist for getting events from your business to Meta, and Mako Metrics’ comparison breaks down the trade-offs well.
- One-click/partner integration: Setup takes 10 to 30 minutes, requires no coding, and costs nothing beyond your existing platform subscription. Best for Shopify, WooCommerce, or other supported e-commerce platforms.
- Meta Conversions API Gateway: Setup takes about an hour, requires basic technical comfort, and runs on Meta’s managed infrastructure. Best for businesses that want server-side tracking without hosting their own container.
- Server-side Google Tag Manager (sGTM): Setup takes several hours to a few days, requires a developer, and typically costs $20 to $100+ per month for hosting. Best for teams that need custom event logic or multi-destination forwarding.
- Direct API integration: Setup takes days, requires a backend developer, and has no platform fee beyond your own server costs. Best for custom software, high-volume events, or CRM-driven conversions.
- Platform native (non-Shopify builders): Varies by platform, usually a checkbox setting inside your website builder or CRM’s ad integrations panel.
In 2026, Meta’s one-click option has become the default recommendation for most merchants because it collapses what used to be a developer project into a five-minute settings change, as Stape’s setup guide confirms.
What Do You Need Before You Start a Conversions API Setup?
A handful of gaps stall most Conversions API projects before they ever reach the testing stage. Clear these first.
- Business Manager admin access. Generating an access token requires admin or at least “Full Control” permission on the ad account inside Meta Business Manager. If you only have “Analyst” access, you cannot generate the token yourself.
- Your Pixel ID. Find it in Events Manager under Data Sources. Click your pixel, and the ID appears at the top of the overview tab. Write it down. You will use this exact number for both browser and server events.
- Domain verification. If you plan to use Aggregated Event Measurement or manage multiple domains under one Business Manager, verify your domain in Business Settings first. Skipping this causes silent event prioritization issues later.
- A secure place to store the access token. Treat the token like a password, because it functions like one. Store it in a password manager such as 1Password or Bitwarden, never in a shared spreadsheet or Slack message.
The Universal Setup Checklist Every CAPI Method Shares
Regardless of which of the five methods you pick, every Conversions API implementation runs through the same core mechanics. Get these right once, and the rest of your setup becomes a matter of choosing where the code lives.
- Generate the access token. In Events Manager, select your pixel, go to Settings, and scroll to Conversions API. Click “Generate Access Token” under the manual setup option. Copy it immediately. Meta shows this token only once in most flows, and Meta’s own developer documentation walks through the exact screen sequence.
- Confirm the Pixel ID matches everywhere. Both your browser Pixel code and your server-side CAPI calls must reference the identical Pixel ID. A mismatch here means Meta treats browser and server events as coming from two unrelated sources, which quietly inflates your reported conversions.
- Set the required payload fields. Every event needs
event_name,event_time(a Unix timestamp), andaction_source(values like “website,” “app,” or “phone_call”). Skipping any of these causes the event to be rejected outright rather than just scored poorly. - Pin your API version. Meta deprecates older Graph API versions on a rolling schedule. Hardcode a specific version number in your requests and track Meta’s changelog, because calls to a sunset version fail silently rather than throwing an obvious error.
- Apply hashing rules correctly. Personally identifiable information, including email and phone, must be lowercased, trimmed of whitespace, then hashed with SHA256 before it leaves your server. The two exceptions are
fbpandfbc, Meta’s own browser identifiers, which must be sent in plain text. Hashing those two breaks matching instead of protecting anything.
Pro Tip: Build a small internal script that hashes and validates your test payloads before you ever send a live event. Catching a formatting mistake in a local test costs you two minutes. Catching it after a week of live campaign data means rebuilding your attribution baseline.
How Do You Set Up One-Click and Partner Integrations?
This is where most businesses should start, and for platforms like Shopify, the entire process happens inside settings menus you already have access to.
- Open Events Manager, select your pixel, and look for “Activate Conversions API” or a partner integration banner, depending on your platform.
- On Shopify specifically, go to your Customer Privacy settings and set Data Sharing to “Maximum.” This unlocks the deepest event coverage the integration supports.
- After activating, check that both Browser and Server show green checkmarks next to your key events (Purchase, AddToCart, InitiateCheckout) in Events Manager.
- Trigger a test purchase and confirm the event appears within a few minutes. Some platforms show a propagation delay of up to 20 minutes before server events populate the interface.
- Verify the access token status shows “Active” rather than “Revoked” or “Pending,” which sometimes happens after a platform update.
If your platform supports one-click, there is rarely a reason to build a custom integration instead. It gets you the reliability of server-side events without touching a line of code.
Setting Up the Conversions API Gateway
Gateway sits between the do-nothing simplicity of one-click and the full control of a self-hosted server container. It works well for businesses that want server-side tracking without managing infrastructure.
- In Events Manager, go to Data Sources, then Conversions API Gateway, and choose your hosting option (Meta-hosted or self-hosted on your own cloud instance).
- Install the Gateway snippet on your site. It automatically proxies pixel events server-side without requiring you to remap every field by hand.
- Confirm which events Gateway is forwarding by checking the event list in your Gateway dashboard against what fires on your live site.
- Run a test transaction and watch Events Manager for the paired browser and server signals.
- Note that self-hosted Gateway instances depend on your cloud provider’s uptime, so factor that into any decision about which hosting option to pick.
Gateway is a reasonable middle path, but it is not a substitute for the granular control that sGTM or a direct integration gives a development team.
Server-Side GTM: Mapping and Forwarding Events Correctly
Server-side GTM is the right call when you need custom event logic, multiple ad destinations from one data stream, or CRM events that a simple pixel can’t capture. The setup has more moving parts, but every part is well documented.
- Provision a server container using a managed host like Stape or by self-hosting on Google Cloud Run. Point your client-side GTM container’s tags to this new server endpoint.
- Inside the server container, add a Facebook CAPI tag. Map your
user_datafields (email, phone, external_id) andcustom_datafields (value, currency, content_ids) to the corresponding request parameters. - Set the
event_idmapping so it pulls the same identifier your client-side pixel tag generates. This is the single most important step for deduplication to function. - Capture
fbpandfbcclient-side, typically through a variable that reads the cookie value, and forward both to the server tag so they arrive with the request instead of getting dropped.
Pro Tip: Forward fbp and fbc through a hidden form field rather than relying purely on cookie capture. Cookie-based capture can lag on slower page loads, and a missing fbp value quietly drags down your match quality score.
Direct API Integration: Payload Rules for Developers
Building against the Graph API directly gives you full control and the fewest abstraction layers, but it also means every rule is your responsibility to enforce.
The endpoint follows a predictable pattern: POST https://graph.facebook.com/v19.0/{pixel-id}/events. Pin that version number in code rather than letting it default, since Meta retires older versions on a fixed schedule and a stale version fails calls without warning.
| Payload Element | Requirement |
|---|---|
data[] array |
Contains one or more event objects; each event is a separate object in the array |
access_token |
The long-lived token generated in Events Manager, sent as a query parameter or in the body |
event_time |
Unix timestamp; must fall within 7 days of when Meta receives the request |
event_id |
Unique string shared with the matching pixel event for deduplication |
user_data |
Hashed fields (em, ph) plus unhashed browser IDs (fbp, fbc) |
- Build retry logic with exponential backoff for any 5xx response, since Meta’s endpoint occasionally throttles under load.
- Validate that your server clock is accurate. A drifted
event_timeoutside the 7-day window causes Meta to silently discard the event. - Log every request and response pair during your first week live, so a mismatched field is easy to trace back to its source.
Why Do Deduplicated Events Sometimes Fail to Merge?
Deduplication is the mechanism that stops Meta from counting one purchase twice, once from the browser pixel and once from your server event. It works by matching event_name and event_id between the two signals, with event_time close enough that Meta’s system treats them as the same real-world action.
- Generate one event_id per transaction, not per request. A common pattern is combining the order ID with the event type, like
order_48213_purchase. Generate this value once, then pass the identical string to both your pixel fire and your server call. - Pass the event_id to the pixel using the
eventIDparameter in yourfbq('track', ...)call, and pass the same string in your server payload’sevent_idfield. - Check Test Events for the “Deduplicated” label, not just “Processed.” A “Processed” status on both browser and server rows without the deduplication tag means Meta is counting the event twice.
- Watch for casing and whitespace differences. The most frequent cause of a failed match is generating the
event_idwith subtly different logic on the client versus the server, according to implementation guides, including extra spaces or inconsistent capitalization in an order ID string.
Deduplication failures are a silent revenue killer. When Meta counts one sale as two conversions, your machine learning optimization gets fed bad data, which pushes budget toward audiences that never actually converted at the rate reported.
Test this before you scale spend. Trigger a real transaction, open Test Events, and confirm both rows carry the identical event_id and show the deduplication tag rather than two separate processed events.
Which User Parameters Improve Event Match Quality Most?
Event Match Quality (EMQ) is Meta’s internal score for how confidently it can tie your server event back to a real user profile it recognizes. The fields you send determine that score directly, and some carry far more weight than others.
- Email (
em) and phone (ph) drive the largest EMQ gains of any parameters you can send, according to implementation guides across the industry. Send both whenever your checkout or lead form collects them. fbpandfbcare Meta’s own browser and click identifiers. They must be forwarded exactly as captured, in plain text, never hashed.external_id(your internal customer or order ID) adds a secondary matching signal, particularly useful for repeat customers across devices.- Name and address fields (first name, last name, city, state, zip) help fill gaps when email or phone is unavailable, though their individual impact is smaller.
Hash every PII field using lowercase, trimmed SHA256, meaning you strip whitespace and convert to lowercase before hashing, never after. If a customer’s data is incomplete, send what you have rather than skipping the event. A purchase event with only a hashed email and unhashed fbp still scores meaningfully better than one with no user data at all.
Pro Tip: Run a quick audit of your checkout form fields against this list. Many stores collect phone numbers at checkout but never map that field into their CAPI payload, leaving a high-value signal on the table for no technical reason.
Respect the privacy boundary here too. Only hash and send data you have a legitimate basis to process, and never attempt to enrich a user profile with fields the customer never actually provided to you.
How Do You Verify Events Are Working Correctly?
Run this four-step check before you trust the setup with live ad spend.
- Open Test Events in Events Manager and keep the tab active on a second monitor.
- Trigger a real action on your site, ideally a full checkout using a test payment method if your platform supports one.
- Observe both rows appear, one tagged Browser and one tagged Server, within a minute or two of the action.
- Confirm the Deduplicated label shows next to the paired events rather than two separate Processed entries.
If something breaks, the fix usually falls into one of four categories:
- No server events appear at all. Check that your access token hasn’t been revoked and that your endpoint URL or Gateway connection is still active.
- Events appear but never deduplicate. This almost always traces back to an
event_idmismatch, covered in detail above. - Match quality looks low. Confirm
fbpandfbcare present and unhashed, and that email/phone fields are hashed correctly rather than sent raw. - API version errors. A rejected call citing a deprecated version means it’s time to bump your pinned version number and retest.
For the first 72 hours after launch, watch three numbers closely: total events received, the percentage tagged as deduplicated, and your reported EMQ score in Events Manager. A sudden drop in any of the three usually means a recent code deploy broke something in the payload, not that Meta’s system changed on its own.
When Post-Click Tracking Software Closes the Gaps CAPI Can’t
CAPI fixes browser-side data loss, but it still depends on your website or CRM correctly firing events in the first place. For businesses running lead-generation funnels where the actual sale, deposit, or signup happens off-site or after a phone call, CAPI alone often has nothing to report back to Meta.
This is the exact gap Trackaff was built to close. Instead of relying only on pixel and server events tied to on-site actions, Trackaff uses a branded form inside the marketing funnel to capture the real post-click outcome and reports it server-side to Meta through the same Conversions API infrastructure covered above.
A lead that never becomes a sale is worse than no lead at all, because Meta’s optimization treats it as a success and spends more chasing the same low-quality traffic.
Trackaff is a stronger fit than a point solution when your business runs affiliate funnels, works with mortgage or insurance brokers, or needs guaranteed delivery of sale events that happen days after the ad click. It layers on top of an existing CAPI setup rather than replacing it, feeding Meta the actual buyer data your own event tracking was never positioned to see.
Privacy Compliance and Conversions API: What You Need to Know
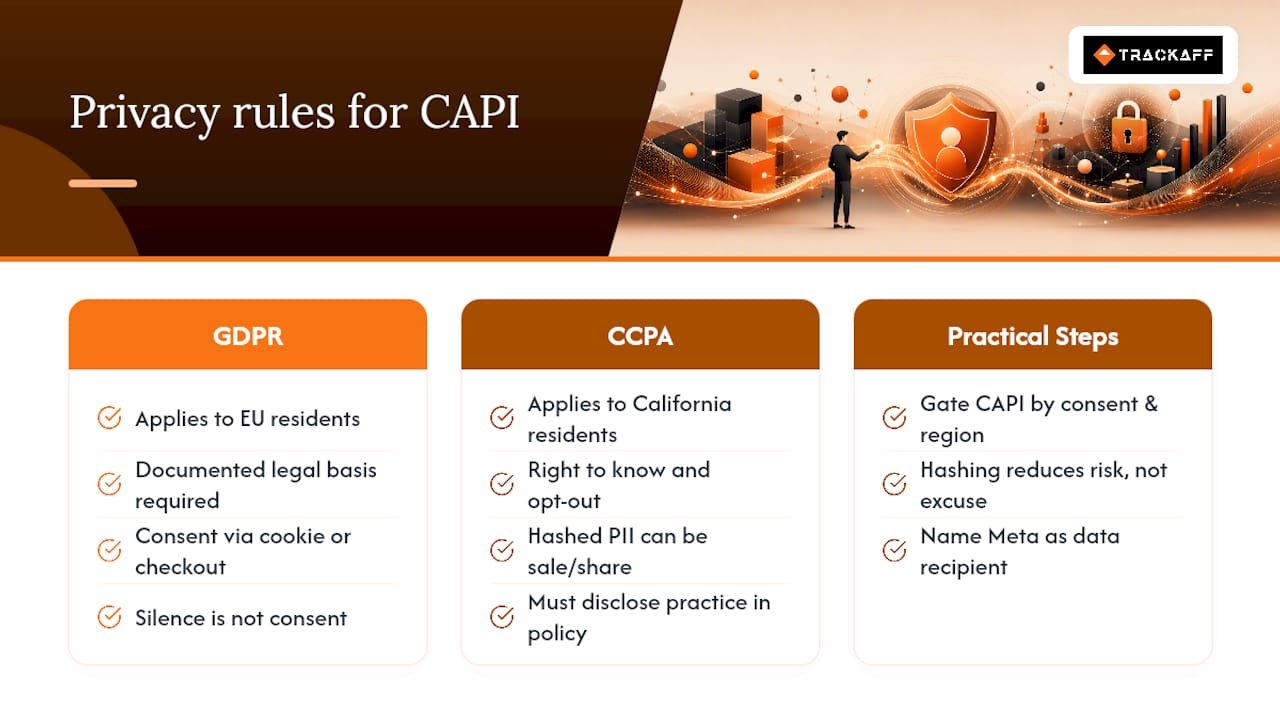
Sending customer data to Meta through CAPI puts you squarely inside privacy law territory, and the rules differ depending on where your customers live. The General Data Protection Regulation (GDPR) governs businesses processing data for people in the European Union, and it requires a documented legal basis before you hash and transmit any PII, even hashed PII. Consent captured through a compliant cookie banner or checkout disclosure typically satisfies this, but silence does not.
The California Consumer Privacy Act (CCPA) and its expansion under the California Privacy Rights Act take a different angle, focusing on a consumer’s right to know what data you collect and to opt out of its sale or sharing. Sending hashed email and phone data to Meta for ad targeting purposes can qualify as a data “sale” or “share” under CCPA’s broad definitions, which means your privacy policy needs to disclose this practice explicitly.
Hashing PII before transmission reduces risk but does not eliminate your compliance obligations. SHA256 hashing is a security measure, not a legal shortcut around consent requirements. Practically, this means your cookie consent tool should gate whether CAPI fires at all for EU visitors who haven’t consented, and your privacy policy should name Meta specifically as a data recipient. If you operate across multiple regions, build your consent logic to check the visitor’s jurisdiction before deciding which fields, if any, get sent.
Security Practices Beyond Hashing: Protecting Your Access Token
PII hashing protects the data inside each event, but the access token protects the pipe that data flows through. Treat token security as a separate problem with its own set of rules.
Store the token in environment variables or a secrets manager like AWS Secrets Manager or Doppler, never hardcoded in a script that might end up in a public repository. If your token appears in a GitHub commit history, even briefly, rotate it immediately, because a scraped token gives anyone the ability to send fabricated events into your ad account.
Limit who inside your organization holds Business Manager admin access. Fewer admins means fewer places a token can leak from, and Meta’s permission tiers let you grant analyst or advertiser-level access to team members who need visibility but not token-generation rights.
Rotate your access token on a regular schedule, not just after a suspected breach. A token that has been active for over a year without rotation is a bigger liability than most teams realize, simply because more people and more systems have had exposure to it over time.
Finally, monitor your Events Manager for unfamiliar event sources or a sudden spike in event volume that you didn’t cause. That pattern often signals a leaked token being used by someone outside your team, and it’s the fastest way to catch a problem before it skews weeks of campaign data.
How Should You Prioritize and Organize Your Events?
Not every event deserves equal weight in your optimization strategy, and sending too many low-value events actually dilutes the signal Meta’s algorithm uses to find buyers.
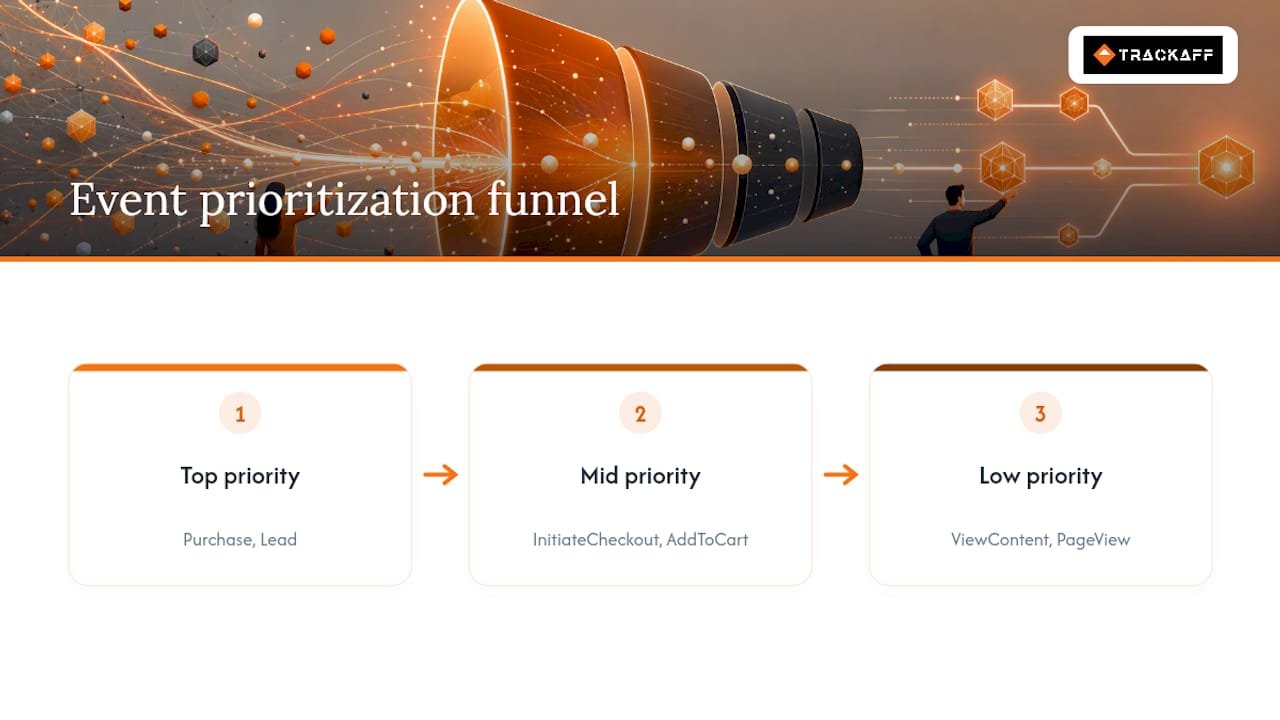
Rank your events by proximity to revenue. Purchase and Lead events that represent an actual sale or qualified conversion should sit at the top, followed by mid-funnel actions like InitiateCheckout or AddToCart, with top-of-funnel signals like ViewContent or PageView at the bottom. In Events Manager, use the event prioritization tool under your pixel’s settings to rank up to eight events for Value Optimization, prioritizing the ones tied directly to revenue outcomes.
Avoid sending every micro-interaction as a standalone conversion event. A business that fires a custom event for every scroll depth or button hover ends up training Meta’s algorithm on noise rather than genuine purchase intent. Keep your event taxonomy lean: a handful of meaningful, well-defined actions outperforms a long list of loosely-tracked ones.
For businesses with multi-step funnels, particularly those using off-site conversion capture, structure your events so the final, revenue-confirming action is the one Meta optimizes toward. This is precisely where a tool that reports guaranteed post-click outcomes, like Trackaff’s branded-form approach covered earlier, keeps your top-priority event honest instead of letting the algorithm optimize toward a soft signal that never became money.
The Real Bottleneck in CAPI Setup Isn’t the API
The technical rules covered here (token generation, hashing, event_id parity) are the easy part, and most guides treat them as the whole story. They’re not. The actual bottleneck is almost always organizational: nobody owns the event taxonomy, nobody checks Test Events after launch week, and nobody audits match quality once the initial setup is declared “done.”
Conventional advice treats CAPI as a one-time technical project. It isn’t. Meta rotates API versions, browser vendors keep changing cookie behavior, and a checkout redesign can silently break your fbp capture without anyone noticing for weeks. Treat verification as a recurring habit, not a launch-day checklist item.
The other blind spot is post-click data. Developers obsess over payload formatting while ignoring that a huge share of real revenue, especially in lead-gen and affiliate businesses, happens somewhere the pixel and server code can never see. Perfect hashing rules don’t fix a fundamentally incomplete data source. Fix the completeness problem first, then optimize the technical delivery.
— Terry
Get Guaranteed Post-Click Reporting With Trackaff
If your Meta ads drive leads that convert somewhere the pixel can’t follow, whether that’s a phone call, a CRM pipeline, or a multi-step application, Trackaff closes that gap without touching your existing CAPI setup. It layers a branded form into your funnel to capture the real purchase, deposit, or registration event and reports it server-side to Meta, so your optimization is finally built around actual buyers instead of raw form fills.
Onboarding connects through CRM webhooks and supports manual approval mode for businesses that want a review step before events fire, and it comes with built-in pixel and CAPI deduplication so nothing gets double-counted. Pricing runs on a subscription tied to the number of connected funnels, with unlimited event submissions per connection and a free trial to test it against your own campaign data before committing.
Start your free trial on the Trackaff landing page and connect your first funnel today.
Sources
The technical steps in this guide draw on Meta’s own documentation and a handful of practitioner walkthroughs worth bookmarking.
- Get Started – Meta for Developers – Facebook
- Facebook Conversions API: 2026 Step-by-Step Setup Guide
- How to Set Up the Meta Conversions API (5 Methods, Compared) | Mako Metrics
Recommended
Your deals close off the pixel. Meta never finds out.
TrackAff reports your real conversions back to Meta the moment they happen, tied to the exact ad that produced them. 10-minute setup, no code.
Start free 14-day trial → Card required · No charge until day 14 · Cancel in one click