

- trackaffadmin
- 0 Comments
- 27 Views
Run Pixel and Conversions API together. Deduplicate with a shared event_id. For most teams, the fastest reliable path is Meta’s Conversions API Gateway or a server-side GTM container. You’ll know it’s working when Events Manager shows “Browser + Server” and “Deduplicated” next to your key events, and your Event Match Quality score starts climbing within days.
TL;DR:
- Using a shared event_id between Pixel and server events is crucial to prevent double counting and ensure accurate deduplication.
- Prioritize sending hashed email and phone number in user_data to improve Event Match Quality, with email being the most impactful.
- For small teams with limited resources, Meta’s Conversions API Gateway offers a good balance of control and ease of setup, while server-side GTM scales best for larger or multiple-funnel setups.
- Accurate cookie forwarding, especially of the _fbp and _fbc cookies, and proper hashing of PII are essential to maintain high match quality and data integrity.
- Regular testing via Events Manager Test Events and verifying the consistency of event_id generation prevents common setup errors and improves campaign performance.
Table of Contents
- What Server-Side Tracking Facebook Setups Actually Fix
- Choosing Your Implementation Method: API, Partner, Gateway, or Server-Side GTM
- Setting Up Facebook Server-Side Tracking: A Step-by-Step Checklist
- How Event_id Deduplication Actually Works
- Event Match Quality: The Fields That Actually Move the Score
- Getting Cookie Forwarding and PII Hashing Right
- Verifying Your Setup With Events Manager Test Events
- Troubleshooting the Most Common Server-Side Tracking Failures
- Real Setups: Platform Connectors and CRM-Fired Revenue Events
- What I’d Prioritize First If I Were Rolling This Out Today
- Where TrackAff Fits When Conversions Happen Off-Site
- Where to Go for the Exact API Fields and Schema
- Sources
What Server-Side Tracking Facebook Setups Actually Fix
The Conversions API (CAPI) is a server-to-server event stream tied to your Pixel. Instead of relying on a browser to fire a tracking pixel, your server sends the same conversion event directly to Meta’s endpoint, along with hashed customer data and the original Pixel ID. Meta requires this connection to a pixel for the event to count toward measurement and optimization.
Pixel-only tracking has been losing ground for years, and the reasons are structural, not temporary. Apple’s App Tracking Transparency framework cut third-party tracking on iOS. Safari and Firefox block third-party cookies by default. Ad blockers strip out pixel scripts before they ever load. None of that touches server-to-server calls, because there’s no browser script to block.
The business case is simple once you see the gap. Every conversion your Pixel misses is a conversion Meta’s algorithm can’t learn from. That means:
- Underreported conversions, which make your campaigns look worse than they actually perform
- Weaker attribution windows, since browser events alone can’t cover cross-device or delayed purchases
- Worse bidding, because Meta’s optimization engine trains on whatever data it receives, and thin data produces thin targeting
CAPI recovers a meaningful share of those lost events by sending them from a server that ad blockers and browser privacy settings can’t touch. It also lets you send events that never happen in a browser at all: a sale closed by a sales rep three days after the lead came in, a subscription renewal, a refund. Pixel can’t see any of that. Your CRM or backend can, and CAPI is the pipe that gets it to Meta.
Choosing Your Implementation Method: API, Partner, Gateway, or Server-Side GTM
There’s no single correct method here. The right choice depends on your team’s engineering bandwidth and how much control you need over event data.
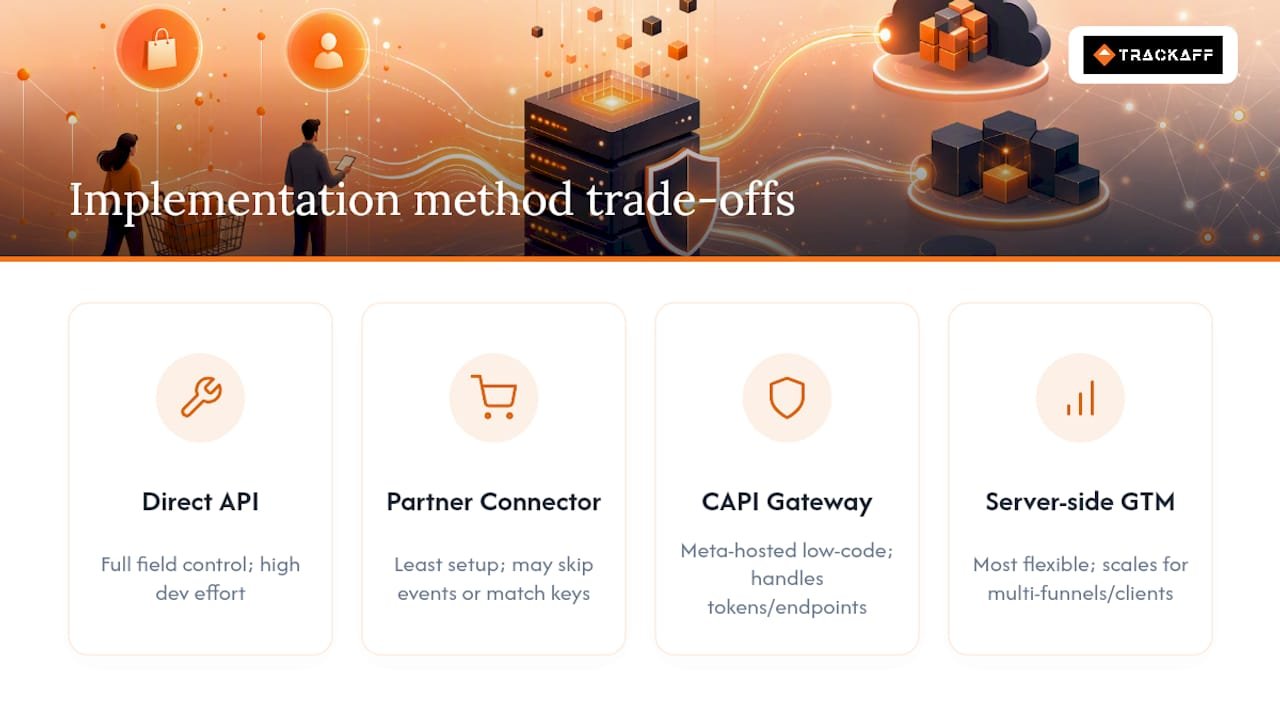
Direct API integration gives you full control over every field you send. You build the server-side code that calls Meta’s endpoint directly, mapping exactly the events and match keys your business needs. This is the right call if you have custom backend systems, CRM-triggered events, or revenue events that don’t map cleanly to a standard e-commerce flow. It’s also the most dev-time-intensive option, and it’s on your team to maintain it as Meta updates its API.
Partner connectors (built into platforms like Shopify or WooCommerce) require the least setup. You flip a switch, connect your Pixel, and the platform handles the server call. The catch: not every connector forwards every event or every match key. Before you trust one, confirm exactly which events it sends and which user data fields it includes. Some connectors send purchase events but skip fbp and fbc, which quietly caps your Event Match Quality.
Meta’s Conversions API Gateway sits between these two. It’s a Meta-hosted, low-code option designed for teams that don’t have engineering resources for a full server-side GTM build but need more control than a generic partner connector gives them. It handles a lot of the token and endpoint management for you, which makes it a reasonable default for small teams and solo marketers running their own ad accounts.
Server-side GTM (sGTM) is the long-term flexible option, and it’s what most agencies and scale-ups eventually land on. You run a server container (often on Google Cloud or a hosted service like Stape), install a CAPI tag template, and route events from multiple sources, your website, your CRM, your app, through one controlled pipeline. It takes more setup effort than a Gateway or a partner connector, but it scales cleanly as event volume grows and gives you a single place to manage deduplication logic, cookie forwarding, and hashing.
A rough way to decide: if you’re a single-site business with a Shopify store, start with a partner connector and check its event coverage. If you’re running your own ad account without dev support, the Gateway is your fastest path. If you manage multiple funnels, CRMs, or clients, server-side GTM is worth the setup time.
Setting Up Facebook Server-Side Tracking: A Step-by-Step Checklist
This is the order that causes the fewest headaches. Skipping steps, especially the token permissions and event_id sharing, is where most implementations go sideways later.
-
Create a system user in Meta Business Manager. Go to Business Settings, generate a system user, and assign it admin access to the specific ad account and Pixel you’re sending events for. Generate a long-lived access token tied to that system user, not to your personal login.
-
Confirm Pixel permissions. The system user token needs explicit permission on the Pixel ID you’ll be sending events to. If this step is skipped, you’ll get authorization errors the moment you try to send a test event.
-
Decide on your event_id generation strategy before you write any code. Use a UUID or your order/transaction ID, generated once per conversion and shared between the browser Pixel call and the server CAPI call. This is the single field that prevents Meta from counting the same purchase twice.
-
Map your user_data fields. At minimum, plan to send hashed email and phone number, plus the
_fbpand_fbccookie values (unhashed, since Meta needs to read those directly). Every piece of personally identifiable information, email, phone, first name, last name, must be hashed with SHA-256 before it leaves your server. -
Configure your server-side tag or endpoint with the Pixel ID, the system user access token, and a Test Event Code from Events Manager. The test code routes your live test events into the Test Events dashboard without polluting your real reporting data.
-
Forward the visitor’s real IP address and user agent, not your server’s or container’s own IP and UA string. This single misstep quietly tanks match quality because Meta ends up trying to match the wrong device fingerprint.
-
Send a test conversion and confirm it lands in Events Manager’s Test Events tab with the fields you expect.
Pro Tip: Build your event_id generator once, as a shared function or a single named variable in your tag manager, and reuse it everywhere. Teams that generate the ID separately on the client and the server almost always end up with a mismatch that breaks deduplication silently.
The API’s required field set includes event_name, event_time, user_data, action_source, and event_id. Note that event_time can be up to seven days before the send time, which matters if you’re firing CRM-based events after a delayed sale closes.
How Event_id Deduplication Actually Works
When your Pixel and your server both report the same purchase, Meta needs a way to know it’s one event, not two. That’s what event_id does. Both the browser-side Pixel call and the server-side CAPI call carry the identical event_id string, and Meta’s deduplication logic matches them and counts the conversion once.
The mechanics matter more than they look. Meta processes deduplication by comparing event_id values between events arriving within a close time window, and if timing is ambiguous, it tends to favor the browser event as the canonical record. That’s a good reason to generate your event_id from something stable, an order ID, a transaction UUID, rather than a timestamp that could drift between the two calls.
Here’s where most teams break deduplication without realizing it:
- Field name or case mismatches. Sending
EventIDon one side andevent_idon the other, or a trailing space in one string, is enough to break the match. - Missing forwarding entirely. If your checkout page generates an ID for the Pixel call but never passes it to the backend event handler, the server call goes out with no ID at all, or a freshly generated one that doesn’t match.
- Race conditions in asynchronous checkouts. If the server event fires before the frontend has finished generating and storing its ID, you get two different values for the same purchase.
When event_id genuinely isn’t available, and this does happen with some legacy backend systems, Meta falls back to matching on a combination of fbp, fbc, and external_id. It’s a weaker fallback than a shared event_id, but it’s far better than sending nothing and letting the same sale get counted twice in your reporting.
Event Match Quality: The Fields That Actually Move the Score
Event Match Quality (EMQ) is a 0 to 10 score Meta assigns to how confidently it can match your server-sent event to a real person in its system. A low score means Meta is guessing at attribution and optimizing on thin data. A high score means your campaigns get credit for the conversions they actually drove, and Meta’s algorithm learns from clean signal.
Hashed email is the single most impactful match key you can send. Adding it alone can raise your Event Match Quality substantially, even when no other identifiers are present.
Not every match key carries equal weight. In rough order of impact:
- Email (hashed) — the strongest single identifier available, and worth prioritizing over every other field if you can only capture one.
- Phone number (hashed) — a close second, especially for businesses where checkout or lead forms collect phone by default.
fbc— the click ID cookie, captured from thefbclidURL parameter when someone arrives from a Facebook or Instagram ad.fbp— the first-party Pixel browser cookie, present on nearly every visitor who has the Pixel installed.client_ip_addressandclient_user_agent— lower-weight signals individually, but they round out the match and help confirm device identity.
Three quick wins get most teams a meaningfully higher score within a week. Require email at checkout or lead submission instead of making it optional. Confirm your server-side setup is actually forwarding _fbp and _fbc cookies, not just the fields your platform decided to send by default. And double-check that the IP address and user agent in your payload belong to the visitor, not your server container or a load balancer sitting in front of it.
Getting Cookie Forwarding and PII Hashing Right
Two technical details separate a clean CAPI setup from one that quietly leaks match quality: cookie handling and hashing discipline.
The _fbp and _fbc cookies live in the visitor’s browser under your own domain. They have to be read from the request and explicitly forwarded into your server payload; they don’t show up there automatically just because you have a Pixel installed. _fbc in particular only gets set when someone clicks through from an ad carrying an fbclid parameter, so your capture logic needs to grab that parameter on landing and persist it into a cookie that survives the session, not just the first page view.
Critically, _fbp and _fbc are sent as plain text. Never hash these values. They’re not personal data in the same sense as email or phone; hashing them breaks Meta’s ability to match the cookie against its own records.
Everything that is personal data, email, phone number, first name, last name, city, state, zip code, needs SHA-256 hashing before it leaves your infrastructure. You have three places you can do this:
- In the browser, before the data ever touches your server. This keeps raw PII out of your server logs entirely, but it requires browser-side crypto libraries and careful implementation.
- In server-side GTM, using built-in hashing variables in the CAPI tag template. This is the most common approach because it’s low-effort and well-documented.
- In your backend code, right before the API call fires. This gives you the most control but means your team owns the hashing logic and its correctness.
Pro Tip: Whichever location you choose, test it by sending a known email and checking the hash Meta receives against a SHA-256 hash you generate independently. A single implementation bug here, extra whitespace, wrong case, can silently break matching for every event you send.
Beyond hashing, treat raw PII as something that should never sit in your infrastructure longer than necessary. Log the hashed values, not the originals, wherever you can.
Verifying Your Setup With Events Manager Test Events
Testing isn’t optional here, and it isn’t a one-time step. Meta’s Test Events tool is how you confirm your setup is actually behaving the way you configured it, not just the way you assume it is.
- Generate a Test Event Code from Events Manager under the Test Events tab for your Pixel, and add it to your server-side tag configuration.
- Trigger a real sample conversion on your live site or a staging environment, ideally a full checkout or lead submission, not a synthetic API call with placeholder data.
- Watch for the event to appear twice, once tagged “Browser” and once tagged “Server,” within the Test Events feed.
- Confirm the “Deduplicated” tag appears next to the matched pair. If it doesn’t show up, your
event_idvalues don’t match between the two calls, and that’s the first thing to debug. - Check the Event Match Quality score shown for the server event and note which fields are marked as received versus missing.
- Review the Diagnostics tab for warnings like
InvalidEvent, missing required fields, or token authorization errors, and resolve each one before turning off test mode.
Meta’s own reference for testing and API parameters documents exactly which fields are required versus optional, which is worth bookmarking the first time you set this up, since the required field list shifts slightly depending on the event type you’re sending.
Troubleshooting the Most Common Server-Side Tracking Failures
Most implementation problems fall into a small set of repeat offenders. Here’s the pattern to look for and the fix that resolves it.
- Symptom: conversions appear duplicated in reporting. Likely cause: missing or mismatched
event_idbetween the Pixel and server calls. Fix: confirm both calls generate the ID from the same source (order ID or shared UUID) and check for case or whitespace mismatches in the field name itself. - Symptom: EMQ score stuck low despite sending events successfully. Likely cause: missing match keys, usually email or phone not being captured or hashed correctly, or
_fbp/_fbcnot being forwarded at all. Fix: audit your payload against Meta’s field list and confirm cookies are read from the request headers, not assumed to be present automatically. - Symptom: match quality drops after moving to server-side GTM. Likely cause: the server container is sending its own IP address and user agent instead of the visitor’s. This happens by default with some proxy configurations. Fix: explicitly forward the original
X-Forwarded-Forheader and user agent string into the CAPI payload, since Meta will otherwise match against the container host rather than the actual visitor. - Symptom: events fail silently with no data reaching Meta at all. Likely cause: an expired or improperly scoped system user access token. Fix: check token expiration settings in Business Manager and confirm the token has permission specifically on the Pixel you’re targeting, not just the ad account.
- Symptom: some events arrive but others never show up. Likely cause: a partner connector or platform integration only forwards a subset of events (often just Purchase, skipping AddToCart or InitiateCheckout). Fix: check your connector’s documentation for exactly which standard events it supports and consider a direct API call for anything it doesn’t cover.
Real Setups: Platform Connectors and CRM-Fired Revenue Events
Two implementation patterns come up constantly, and each has its own checklist.
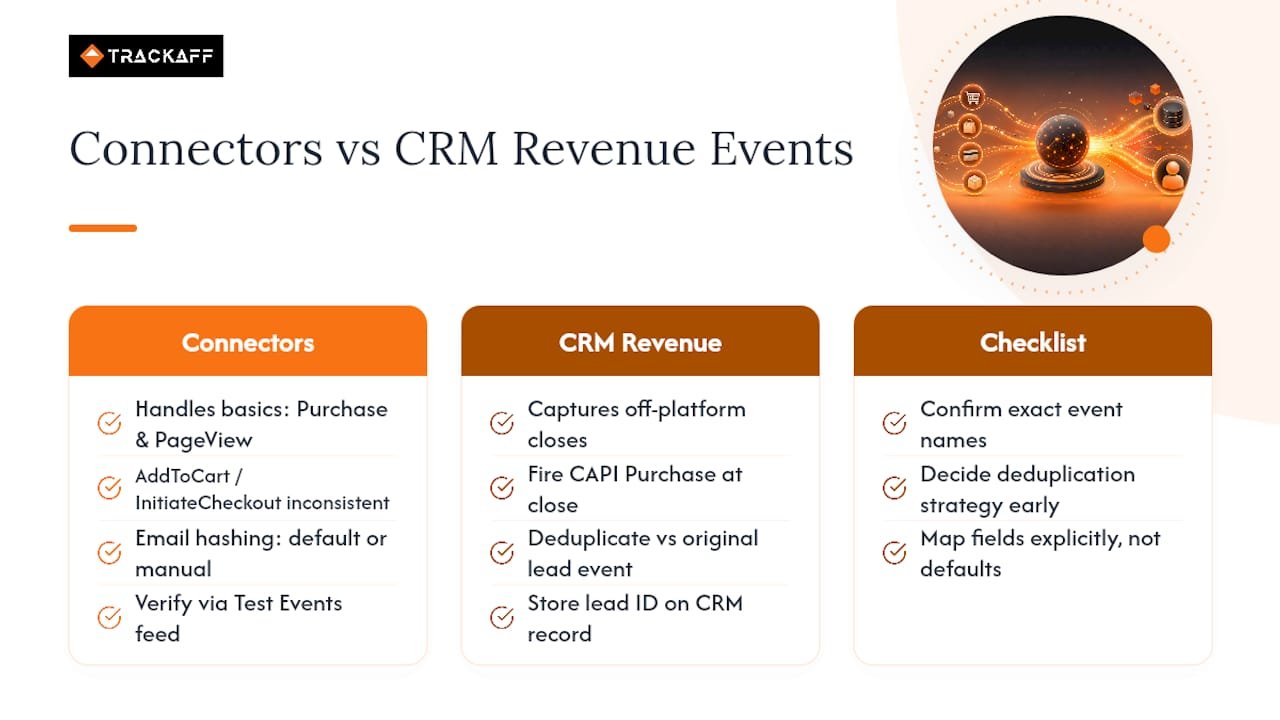
Shopify and WooCommerce connectors handle the basics well but vary in coverage. Before trusting one, verify exactly which standard events it fires (Purchase and PageView are nearly universal; AddToCart and InitiateCheckout are less consistently supported) and which match keys it includes in the payload. Some connectors send hashed email by default; others require you to enable that setting manually. Run a live test purchase and check the Test Events feed rather than assuming the connector’s marketing copy matches its actual behavior.
CRM-fired revenue events solve a different problem: the sale that closes days after the original lead, off-platform, with no browser event to capture it. Firing a CAPI purchase event at the moment a deal closes in your CRM, rather than relying on a form submission as a stand-in for revenue, gives Meta a materially more accurate picture of which ad clicks actually turned into paying customers. The key implementation detail is deduplication against the original lead event. If the lead form fired a Pixel event with its own event_id, don’t discard that ID. Store it against the CRM record so the eventual close-of-sale event can either reuse it or explicitly reference it as a related conversion.
For both patterns, the same three-item checklist applies: confirm the exact event names being sent, decide your event_id strategy before data starts flowing, and map user_data fields explicitly rather than trusting a default configuration.
What I’d Prioritize First If I Were Rolling This Out Today
If you’re implementing this for the first time, resist the urge to map every event on day one. Start with Purchase and Lead, whichever event actually drives your ad optimization, and get those two events sending clean hashed email and a reliable event_id before touching anything else. Everything downstream, EMQ, deduplication accuracy, bidding performance, depends on those two fields more than any other setup decision you’ll make.
Expect visible EMQ movement within days, not weeks, once email is flowing correctly. If the score doesn’t move, the Diagnostics tab in Events Manager will usually tell you exactly which field is missing rather than leaving you guessing. Check it daily during the first week.
The part teams underestimate is coordination, not code. Server-side tracking often touches your CRM and your sales team, not just your dev team, especially if you’re firing purchase or deposit events after a sale closes outside your website. A rollout that skips that conversation ends up with a technically correct CAPI integration that never actually closes the attribution loop, because nobody told sales their close-of-sale action needed to trigger anything. Get the events flowing, then get the humans firing them talking to each other.
— Terry
Where TrackAff Fits When Conversions Happen Off-Site
Everything above assumes your conversion event fires somewhere you control, a checkout page, a CRM you own. Plenty of real conversions don’t work that way. A deposit taken over the phone, a policy bound by a broker, a service booked through a third-party scheduler; none of that leaves a clean server event unless something is built specifically to catch it.
That’s the gap Trackaff closes. It places a branded form inside your marketing funnel that captures the actual post-click event, purchase, deposit, registration, and reports it back to Meta through the Conversions API, with pixel and CAPI deduplication already handled. For agencies managing client ad accounts, sales teams closing leads days after the click, and affiliate funnels where the conversion happens on someone else’s platform, this solves the exact problem a standard CAPI setup can’t: getting guaranteed sales data back to Meta when the sale itself never touches your own server.
Using such an approach can lead to lower cost per acquisition, as Meta can optimize against real buyers instead of form fills or lead submissions that never close. If your funnel has an off-site conversion step that today has no server event attached to it, start a free trial and connect your first funnel to see what your actual EMQ and conversion data look like once that gap is closed.
Where to Go for the Exact API Fields and Schema
Once your setup is running, keep these bookmarked for the moments you need exact parameter names rather than general guidance.
Meta’s own Conversions API documentation for server-side GTM covers the official field requirements and server container setup. The API swagger specification lays out every required and optional field in the raw schema, useful when you need to confirm a field name character-for-character. For hands-on implementation walkthroughs, Simo Ahava’s server-side tagging guide remains one of the most detailed community resources for mapping event_id and cookie values inside a GTM server container.
Sources
- Conversions API for Server-Side Google Tag Manager (GTM)
- Meta Conversions API: Setup, Integration & Event | Digital Codex
- Facebook Conversions API (for Web) swagger / API spec
- Facebook Conversions API Using GA4 Web Tags And A GTM Server
Recommended
Your deals close off the pixel. Meta never finds out.
TrackAff reports your real conversions back to Meta the moment they happen, tied to the exact ad that produced them. 10-minute setup, no code.
Start free 14-day trial → Card required · No charge until day 14 · Cancel in one click